MEMBUAT APLIKASI LIST ARRAY ADAPTER DI ANDROID
Membuat tampilan List ArrayAdapter menggunakan ADT
Array adalah koleksi dari object yang mempunyai tipe identik / sama, array dapat disebut juga koleksi data dengan setiap elemen data menggunakan nama yang sama dan masing-masing elemen mempunyai tipe data sama. Array dapat diloop dengan memberi indeks setiap item di dalamnya, dan setiap komponen / item array dapat diakses dan dibedakan melalui indeks array.
Langkah pertama buat Project dengan nama CobaArray.
selanjutnya buat kelas Almag dan Array2.
Langkah kedua masukkan source code pada kelas Almag.java
package com.example.cobaarray;
import android.os.Bundle;
import android.app.Activity;
import android.view.Menu;
public class Almag extends Activity {
private String nama="";
private String alamat="";
private String jekel="";
public String getNama() {
return(nama);
}
public void setNama(String nama) {
this.nama=nama;
}
public String getAlamat() {
return(alamat);
}
public void setAlamat(String alamat) {
this.alamat=alamat;
}
public String getJekel() {
return(jekel);
}
public void setJekel(String jekel) {
this.jekel=jekel;
}
public String toString() {
return(getNama());
}
@Override
protected void onCreate(Bundle savedInstanceState) {
super.onCreate(savedInstanceState);
setContentView(R.layout.activity_almag);
}
@Override
public boolean onCreateOptionsMenu(Menu menu) {
// Inflate the menu; this adds items to the action bar if it is present.
getMenuInflater().inflate(R.menu.almag, menu);
return true;
}
}
Langkag ketiga source code untuk file Almag.xml
<RelativeLayout xmlns:android="http://schemas.android.com/apk/res/android"
xmlns:tools="http://schemas.android.com/tools"
android:layout_width="match_parent"
android:layout_height="match_parent"
android:paddingBottom="@dimen/activity_vertical_margin"
android:paddingLeft="@dimen/activity_horizontal_margin"
android:paddingRight="@dimen/activity_horizontal_margin"
android:paddingTop="@dimen/activity_vertical_margin"
tools:context=".Almag" >
<TableLayout android:id="@+id/details"
android:layout_width="fill_parent"
android:layout_height="wrap_content"
android:layout_alignParentBottom="true"
android:stretchColumns="1">
<TableRow>
<TextView android:text="Name:" />
<EditText android:id="@+id/nama" />
</TableRow>
<TableRow>
<TextView android:text="Jekel:" />
<RadioGroup android:id="@+id/jekel">
<RadioButton android:id="@+id/pria"
android:text="Pria"/>
<RadioButton android:id="@+id/perempuan"
android:layout_width="wrap_content"
android:text="Perempuan"/>
</RadioGroup>
</TableRow>
<TableRow>
<TextView android:text="Alamat:" />
<EditText android:id="@+id/alamat" />
</TableRow>
<Button android:id="@+id/save"
android:layout_width="fill_parent"
android:layout_height="wrap_content"
android:text="Save"
/>
</TableLayout>
<ListView android:id="@+id/almag"
android:layout_width="fill_parent"
android:layout_height="wrap_content"
android:layout_alignParentTop="true"
android:layout_above="@id/details"
/>
<ListView android:id="@+id/almag"
android:layout_width="fill_parent"
android:layout_height="wrap_content"
android:layout_alignParentTop="true"
android:layout_above="@id/details"
/>
</RelativeLayout>
Keempat source code untuk file Array2.java
package com.example.cobaarray;
import java.util.ArrayList;
import java.util.List;
import android.app.Activity;
import android.os.Bundle;
import android.view.View;
import android.view.View.OnClickListener;
import android.widget.ArrayAdapter;
import android.widget.Button;
import android.widget.EditText;
import android.widget.ListView;
import android.widget.RadioGroup;
public class Array2 extends Activity{
List<Almag> model = new ArrayList<Almag>();
ArrayAdapter<Almag> adapter = null;
public void onCreate(Bundle saveInstanceState) {
Bundle savedInstanceState = null;
super.onCreate(savedInstanceState);
setContentView(R.layout.activity_almag);
Button save=(Button)findViewById(R.id.save);
OnClickListener onSave = null;
save.setOnClickListener(onSave);
ListView list=(ListView)findViewById(R.id.almag);
adapter=new ArrayAdapter<Almag>(this, android.R.layout.simple_list_item_1, model);
list.setAdapter(adapter);
}
private View.OnClickListener onSave=new View.OnClickListener() {
public void onClick(View v) {
Almag r=new Almag();
EditText nama=(EditText)findViewById(R.id.nama);
EditText alamat=(EditText)findViewById(R.id.alamat);
r.setNama(nama.getText().toString());
r.setAlamat(alamat.getText().toString());
RadioGroup jekel=(RadioGroup)findViewById(R.id.jekel);
switch (jekel.getCheckedRadioButtonId()) {
case R.id.pria:
r.setJekel("Pria");
break;
case R.id.perempuan:
r.setJekel("Perempuan");
break;
}
adapter.add(r);
}
public void onClick1(View arg0) {
// TODO Auto-generated method stub
}
};
}
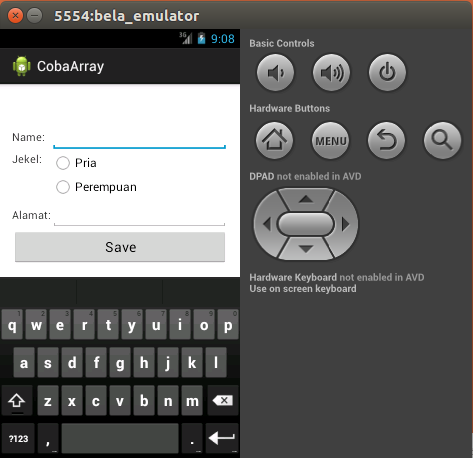
TAMPILAN EMULATOR :


Komentar
Posting Komentar